Install
Rhasspy can be installed in several different ways. The easiest way is with Docker, which will pull a 1.5-2GB image with all of the officially supported services.
Docker
The easiest way to try Rhasspy is with Docker. To get started, make sure you have Docker installed:
$ curl -sSL https://get.docker.com | sh
and that your user is part of the docker group:
$ sudo usermod -a -G docker $USER
Be sure to reboot after adding yourself to the docker group!
Next, start the Rhasspy Docker image in the background:
$ docker run -d -p 12101:12101 \
      --name rhasspy \
      --restart unless-stopped \
      -v "$HOME/.config/rhasspy/profiles:/profiles" \
      -v "/etc/localtime:/etc/localtime:ro" \
      --device /dev/snd:/dev/snd \
      rhasspy/rhasspy \
      --user-profiles /profiles \
      --profile en
This will start Rhasspy with the English profile (en) in the background (-d) on port 12101 (-p) and give Rhasspy access to your microphone (--device). Any changes you make to your profile will be saved to /home/<YOUR_USER>/.config/rhasspy.
Once it starts, Rhasspy's web interface should be accessible at http://localhost:12101. If something went wrong, trying running docker with -it instead of -d to see the output.
If you're using docker compose, add the following to your docker-compose.yml file:
rhasspy:
    image: "rhasspy/rhasspy"
    container_name: rhasspy
    restart: unless-stopped
    volumes:
        - "$HOME/.config/rhasspy/profiles:/profiles"
        - "/etc/localtime:/etc/localtime:ro"
    ports:
        - "12101:12101"
    devices:
        - "/dev/snd:/dev/snd"
    command: --user-profiles /profiles --profile en
Rhasspy runs an MQTT broker inside the Docker image on port 12183 by default. Connecting to this broker will let you interact with Rhasspy over its MQTT API.
Raspberry Pi Zero
Docker on the Raspberry Pi Zero appears to be broken, and will pull the wrong Docker image by default. To fix this, you must enable "experimental" features in your Docker daemon and explicitly specify the platform.
First, edit your /etc/docker/daemon.json file (create it if it doesn't exist using sudo) and add the following content:
{
  "experimental": true
}
Next, restart your Docker daemon by running:
$ sudo systemctl restart docker
Finally, pull the correct Docker image:
$ docker pull --platform linux/arm/v6 rhasspy/rhasspy
Updating
To update your Rhasspy Docker image, simply run:
$ docker pull rhasspy/rhasspy
If you're using a Raspberry Pi Zero, make sure to specify the platform:
$ docker pull --platform linux/arm/v6 rhasspy/rhasspy
After pulling the latest Rhasspy image, your Rhasspy container is still based on the old image. So to apply the update to your running Rhasspy instance, you also have to:
- Stop the container:
docker stop rhasspy - Remove the container:
docker rm rhasspy - Create the container again with your original
docker runcommand.
After this, the Rhasspy container is running from the newest image you downloaded with the docker pull command.
If you're using Docker Compose to run Rhasspy, just go into the directory of your docker-compose.yml file and execute the following commands:
$ docker-compose pull
$ docker-compose up -d
The first command downloads the latest Rhasspy image and the second command recreates your container from this new image.
Debian
Pre-compiled packages are available for Debian-based distributions (Ubuntu, Raspberry Pi OS, etc.) on amd64, armhf, armel, and arm64 (aarch64) architectures. These packages are built using Docker and dpkg.
Download the appropriate .deb file for your CPU architecture:
- amd64 - Desktops, laptops, and servers
- armhf - Raspberry Pi 2, and 3/3+ (armv7)
- arm64 - Raspberry Pi 3+, 4
- armel - Raspberry Pi 0, 1
If you're unsure about your architecture, run:
$ dpkg-architecture | grep DEB_BUILD_ARCH=
which will output something like:
DEB_BUILD_ARCH=amd64
Note that this should be armel for the Raspberry Pi Zero, but it may lie and say armhf.
Next, install the .deb file:
$ sudo apt install /path/to/rhasspy_<VERSION>_<ARCH>.deb
where where <VERSION> is Rhasspy's version (probably 2.5.X) and <ARCH> is your build architecture.
Now you can run rhasspy from the command-line:
$ rhasspy --profile en
and access the web interface at http://localhost:12101
To upgrade in the future, you can remove Rhasspy with sudo dpkg -r rhasspy and then install the new Debian package.
Mosquitto Error
If you receive an error like can't find command 'mosquitto', first make sure that it was properly installed:
$ sudo apt install mosquitto
If mosquitto was installed, the binary may have been put in /usr/sbin and might not be in your $PATH.
You will either need to add /usr/sbin to $PATH in your .profile or run Rhasspy like this:
$ PATH="$PATH:/usr/sbin" rhasspy --profile en
Virtual Environment
See the Github documentation. On a Debian system, you should only need to install the necessary dependencies:
$ sudo apt-get update
$ sudo apt-get install \
       python3 python3-dev python3-setuptools python3-pip python3-venv \
       git build-essential libatlas-base-dev swig portaudio19-dev \
       supervisor mosquitto sox alsa-utils libgfortran4 libopenblas-dev \
       espeak flite \
       perl curl patchelf ca-certificates
and then clone/build:
$ git clone --recursive https://github.com/rhasspy/rhasspy
$ cd rhasspy/
$ ./configure --enable-in-place
$ make
$ make install
This will install Rhasspy inside a virtual environment at $PWD/.venv by default with all of the supported speech to text engines and supporting tools. When installation is finished, copy rhasspy.sh somewhere in your PATH and rename it to rhasspy.
The --enable-in-place option will use the source files in the Rhasspy submodules (e.g., rhasspy-nlu-hermes/rhasspynlu_hermes) directly instead of installing them with pip. This allows you to change the code and simply re-run rhasspy.sh with the modifications.
Customizing Installation
You can pass additional information to configure to avoid installing parts of Rhasspy that you won't use. For example, if you only plan to use the French language profiles, set the RHASSPY_LANGUAGE environment variable to fr when configuring your installation:
$ ./configure RHASSPY_LANGUAGE=fr --enable-in-place
The installation will now be configured to install only Kaldi (if supported). If instead you want a specific speech to text system, use RHASSPY_SPEECH_SYSTEM like:
$ ./configure RHASSPY_SPEECH_SYSTEM=deepspeech --enable-in-place
which will only enable DeepSpeech (on supported platforms). The RHASSPY_WAKE_SYSTEM variable controls which wake system is installed, such as precise or porcupine.
To force the supporting tools to be built from source instead of downloading pre-compiled binaries, use --disable-precompiled-binaries. Dependencies will be compiled in a build directory (override with $BUILD_DIR during make), and bundled for installation in download (override with $DOWNLOAD_DIR).
See ./configure --help for additional options.
Updating
To update your Rhasspy virtual environment, you must update your code and any dependencies:
$ git submodule foreach git pull origin master
$ git pull origin master
$ ./configure --enable-in-place
$ make
$ make install
Home Assistant
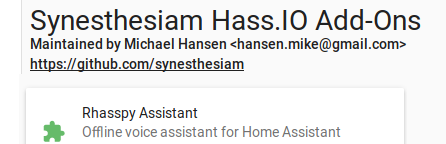
Rhasspy can be installed as a Home Assistant add-on using the following button:

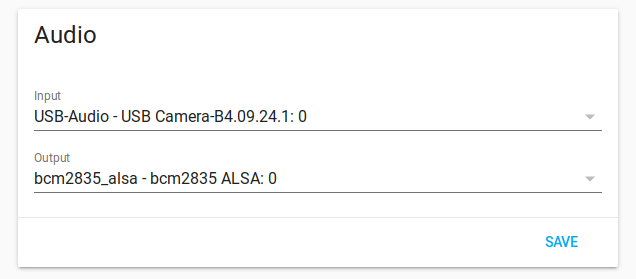
Before starting the add-on, make sure to give it access to your microphone and speakers:
Windows Subsystem for Linux (WSL)
If you're using Windows, you can run Rhasspy inside WSL and access its web interface from Windows. This setup is mainly useful when you want to work on the Rhasspy source code. If you just plan to use it as an end user you should stick to Docker.
Prequisites
This documentation assumes that you have already set up a WSL environment. If not, you can do that by following this guide. It is recommended to use Debian or a derivate like Ubuntu. The following steps were tested on Ubuntu 20.04 running in WSL 2.
Rhasspy
Installing Rhasspy is basically the same procedure as if you were running Linux natively. Open your WSL terminal and follow the steps from the section Virtual Environment.
After you have started Rhasspy, open a web browser in Windows and open http://localhost:12101. You should see the Rhasspy web interface.
You could use Rhasspy now, but you won't hear anything and can't interact with it with your voice because audio is not working. Stick to the next section to learn how to fix that.
Enabling audio
WSL does not natively support audio devices. Fortunately, there is a solution for that: You can run a PulseAudio server on the Windows side and tell your PulseAudio clients in WSL to use the Windows PulseAudio server over the network.
Installation on Windows
You can find pre-build binaries for Windows on this website. After downloading the zip file, extract it and make the following config changes:
etc/pulse/default.pa:
From: #load-module module-native-protocol-tcp
To:   load-module module-native-protocol-tcp auth-anonymous=1
Some guides use the option auth-ip-acl here, which is not required when you use auth-anonymous=1 (this tells
PulseAudio to accept every connection).
etc/pulse/daemon.pa:
From: ; exit-idle-time = 20
To:   exit-idle-time = -1
After that you may need to add an exception for "pulseaudio.exe" to your Firewall (at least this was required for the Windows Firewall). You may add a rule that allows TCP traffic for private and public networks.
That’s it for the Windows side! You can launch "pulseaudio.exe" now.
Installation on Linux
Install the PulseAudio command line tools:
$ sudo apt install pulseaudio-utils
Now you need to tell PulseAudio to use the remote server, which is running on your Windows host. You can do that by defining an environment variable (you may want to add that line to your ".bashrc" file):
$ export PULSE_SERVER=tcp:$(grep nameserver /etc/resolv.conf | awk '{print $2}');
You can use Netcat to see if a connection to the PulseAudio server can be established:
$ nc -vz $(grep nameserver /etc/resolv.conf | awk '{print $2}') 4713
Netcat should immediately return "Connection to 4713 port [tcp/*] succeeded!".
parecord and paplay should also work now.
ALSA
Rhasspy uses ALSA to play and record audio. That’s why we need to tell ALSA to use a virtual PulseAudio device. This is quite easy.
Open "/etc/asound.conf" and insert the following content:
pcm.!default {
    type pulse
    # If defaults.namehint.showall is set to off in alsa.conf, then this is
    # necessary to make this pcm show up in the list returned by
    # snd_device_name_hint or aplay -L
    hint.description "Default Audio Device"
}
ctl.!default {
    type pulse
}
"type pulse" requires some extra libraries that can be installed with the following command:
$ sudo apt install libasound2-plugins
After that arecord and aplay should work just like their PulseAudio counterparts.